Pages

Jan 31, 2020

A Borrowed Buffalo Plaid Button Down Shirt

Having a teenage daughter is so much fun!! I get to borrow her clothes :-) She picked up this buffalo plaid button down top from Target with some Christmas money she received. And since this wouldn't neccessarily be something I'd pick out for myself, she allowed me to try it on and see how I like the look of it at this time in my life. (I'm sure I had one or two plaid button downs at some point in my teenage years.)


*Please note: This post includes some affiliate links, meaning I may earn a small commission if you purchase something through the links. As always, this is at no cost to you. Thank you so much for your support!*


Buffalo plaid prints have been a big trend last fall, and from what I read online the trend will continue into spring along with other plaid patterns. By the way, this shirt is still available at Target online and possibly even at your local store. I'm wearing XS and it runs true to size. It's made out of a soft rayon and not a thick flannel, so it would be perfect for spring.


I decided to layer it over a white scoopneck long sleeve tee (old - similar option, short sleeve option),  left unbuttoned and I've worn it the way I'd wear a cardigan. My daughter has worn it yesterday layered over a black tank and it looked great as well.


My jeans are AG skinny jeans I purchased from eBay for a much lower price than what they are originally sold for, folded up once for an ankle fit. These leather booties are by Miz Mooz (very comfortable), but not very practical for our current weather (snow) but I wanted to try this top on with a pair of brandy colored boots. I purchased my boots from Nordstrom a couple of years ago, but this specific style is no longer available there, however I did find them on Amazon, otherwise directly at Miz Mooz or from eBay. They run true to size. 


This beautiful cat  loves to bite. She recently bit into my upper arm as she was laying on me. For no apparent reason! I think she was bothered by my breathing and the way my arm must have moved as I was taking a breath. Silly cat!! You cannot trust her! Luckily I was wearing a knit sweater on that day. 


The sleeves were a little bit too long on me so I decided to fold them up a couple of times for a better fit.

For accessories I'm wearing a simple silver toned double strand necklace I found at Target several months ago (alternative options HERE.) Maybe a bracelet would have been nice to add, but I rarely think of those details because I tend to be a minimalist when it comes to style.


I've linked up a few more plaid options below for those of you interested.


More Plaid Options Below...

Nordstrom


Thank you so much for stopping by! Hope you enjoy your weekend! 


I'm linking up with these wonderful blogs.

Btw, you can also find me here:

Pinterest // Instagram // Facebook

You can also use the "follow by email" function on the blog's sidebar to receive a notification when a new post goes live.

Jan 25, 2020

Allsorts Challenge 556: Take Flight

Hello and welcome!  I'm back today with my card for the new Allsorts challenge theme. It's Tracy's turn to host and she chose the theme of Take Flight, so anything that can fly. I hope you can join us for a chance to win. This week our prize comes from Swedish House Crafts!


Please note: This post includes some affiliate links, meaning I may earn a small commission if you purchase something through the links. As always, this is at no cost to you. Thank you so much for your support!


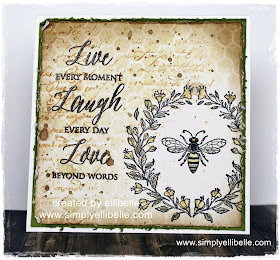
I used a cute stamp from the Penny Black set Happy Critters, heat embossed using Versafine Clair Nocturne ink and Clear Embossing Powder, and I colored with a mix of Copic Markers and Faber Castell Polychromos pencils. The butterflies are part of a wood mounted Penny Black stamp (What a Spring - old, linked to ebay). 

It's hard to tell but the background was inked with Tumbled Glass ink and I used an old Cloud stencil from Stampin Up to create clouds. You can easily make your own cloud stencil out of a scallop circle punch or even cut by hand if you don't own one, there are Youtube videos available to show you how to. 

Grass from the Penny Black set Enjoy Life was stamped using Shabby Shutters and Mowed Lawn Distress inks and then I added the border die cut using Penny Black's die Love Always. I first inked up a strip of paper using Shabby Shutters and Picked Raspberry  ink, then cut it out with a manual Big Shot machine. 


Sentiment is also from Penny Black, from the set Sweet Wishes, also heat embossed. When the card front was complete, I ran it through my die cutting machine using Avery Elle's Wonky Stitches Die.


I'm linking up with these blogs:
Colour Crazy Challenge - Coloring // Daring Cardmakers - Cheer Someone Up // Double D Challenges - Balloons // Mod Squad - Animals // Simon Says Stamp - Pets // The Three Muses  - Happiness // 2 Crafty Critter Crazies - Critters // Happy Little Stampers - Dies // Let's Craft & Create Challenge - Love is in the Air // Double Trouble Challenges - Say Cheese // Penny Black Saturday Challenge - PB stamps // Inspire me Mondays
Inspire Me Monday

Thanks so much for visiting!!


Amazon shopping links are below for those of you interested. Remember, these are affiliate links, meaning I may earn a small commission if you purchase something through the links, as always at no cost to you. 

Jan 24, 2020

A Cashmere Sweater to Wear Now and Into Spring, And How I Clean Cashmere Sweaters

Happy Friday! 

How has your week been? I hope you're staying warm! We've had some chilly and icy weather here last weekend, I made yummy homemade chicken noodle soup per my daughter's request and just enjoyed being home. And I finally took the time for a little re-organization in my craft room. This whole week it's been snowing on and off and I'm hoping for some calmer weather next week.

Since the weather wasn't playing along last weekend, we took today's outfit pictures inside (I always take outfit pictures the weekend before my Friday fashion posts). I'm ok with how they turned out and it surely beats the strange looks we're getting when taking photos outside in winter with no coat on :-) Not that I really care, but it's just a little weird.


Please note: This post includes some affiliate links, meaning I may earn a small commission if you purchase something through the links. As always, this is at no cost to you. Thank you so much for your support!


I didn't really plan on buying a new sweater,  but somehow I ended up checking out Nordstrom's Winter sale and found a pretty Cashmere sweater at 50% off. I do have another cashmere sweater that I love and wear a lot (hard to believe I've not shown you an outfit with it yet!) but my brain has been "wishfully thinking of spring" and I thought the pretty purple would be a great color to wear now and into spring when it's still chilly outside.

I was actually first drawn to the Blue Mazarine colored sweater (see below), it reminded me of one of my favorite Distress Ink color - Blueprint Sketch. I think this blue would look amazing worn with white jeans!! However, since I wear blue jeans about 90% of the time, I thought the purple would coordinate better.

But isn't this a gorgeous color!!!


HALOGEN<SUP>®</SUP> V-Neck Cashmere Sweater, Main, color, BLUE MAZARINE

This sweater is 100% cashmere but it's on the thinner side, which is probably the reason why it's more affordable than some cashmere. That said, I think it's perfect for early spring weather and can easily be worn under a coat or jacket.


I chose to wear boot cut jeans from White House Black Market (very similar option) I picked up on clearance years ago but rarely wear them because they are a little too long on me. I should probably get rid of them but I love the wash and how they fit otherwise. They would look better with higher heels, but if you've followed my outfit posts, then you'll already know that I rarely wear heels. Here I am wearing my Clark's ankle boots (old - similar style) that do have a little bit of a heel and I do wear these regularly as they are very comfortable.


Since I'm short, the sweater is a little bit longer on me than I prefer. In the above picture I tucked it in the front to change up the look.


The two pictures above aren't the best quality but I tried to get a picture of the pretty v-neck in the back.


How I care for cashmere sweaters:

I simply hand wash using Woolite Delicates in cool water, then rinse in cold water. It's important to note that warm water will cause your cashmere to shrink.

Do not twist the sweater to remove the water! I simply hold the sweater over the tub and squeeze the water out as I move my hands up and down.
Using a dry towel, you can now roll up the sweater in the towel (roll up like a yoga mat), and squeeze more water out of it as you roll it up. (I don't always do this.)

Lay flat to dry.

If wrinkles are present after drying, you should use a steamer. I don't own a steamer so I use the steam option on my iron instead. But do not press down the iron, just apply the steam from about an inch or so above the sweater. You can lay a damp cloth (like a cotton dishtowel) over the sweater and iron it through the cloth on low heat setting.

Cashmere (and any kind of knit sweaters) should  always be folded and never hung up on hangers. Be sure the sweater is completely dry before folding.

Most sweaters do pill at some point and I have been using this sweater stone on them with good results. Then of course, as with all knits, cashmere sweaters should also be folded and not hung up on hangers.

Please note: My Cashmere sweaters do say "Dry Clean" but this is the method I use. I am not an expert so please be careful with your expensive cashmeres, I just wanted to share what works for me.


Below I've linked up a few cashmere sweaters I found on sale from Nordstrom. Remember, shipping and return shipping is always free through Nordstrom.  

As a reminder, these and some of the links above are affiliate links.


Double V-Neck (several colors available) //  Crewneck (several colors available) 

 
Buffalo Plaid Silk & Cashmere (runs small -order 1 size up // Turtleneck (only color and limited sizes but such a pretty shade of red!) // Striped Cable Knit // Cable Knit (only color) 


Thank you so much for stopping by! Hope you enjoy your weekend! 


I'm linking up with these wonderful blogs.

Btw, you can also find me here:

Pinterest // Instagram // Facebook

You can also use the "follow by email" function on the blog's sidebar to receive a notification when a new post goes live.


Jan 18, 2020

Feminine And More Than A Single Word

Good morning! Today I have two cards to share, it's the 18th meaning it's time for my midmonth creation for the Penny Black and More challenge blog and then it's also Saturday when the new theme at Allsorts challenge goes live! Hope you can join us for your chance to win! We have some fantastic prizes to give away - a prize by Craft Stash from Allsorts and prizes from Penny Black and Blade Rubber Crafts at Penny Black and More.


Please note: This post includes some affiliate links, meaning I may earn a small commission if you purchase something through the links. As always, this is at no cost to you. Thank you so much for your support!


Both cards feature stamps illustrated by Mo Manning.

First up is my card for Penny Black and More where our theme this month is "Make it Feminine". This stamp  All Connected is new to me, I came across it on Ebay at the end of last year for only $6 with free shipping and I had to have it :-)


I heat embossed the image on Bristol Vellum paper using my usual Versafine Clair and clear embossing powder, colored with Faber Castell Polychromos Pencils then fussy cut. The floor was done with Penny Black's Wood Floor Die Set, inked with Antique Linen distress ink. The pretty pattern paper is from my stash (by Stampin up and really old). As you might have guessed, I had to add the flower to the chair because some ink transfered to the card stock where it wasn't supposed to. Then I decided to add the other flower and Twine. I feel like it needed a 3rd flower (two just seems weird) but I couldn't decide where to put it so I left it as is.


Stampavie Rae with Journal (Stampavie out of business but I found this stamp in a larger size by Penny Black) // Penny Black Brick Wall // Penny Black wood mounted sentiment stamp (old) // Penny Black Oscillations Stencil // Ink Blending Tool (I have these but really want these) //  Memento Tuxedo Ink // Pumice Stone Distress Oxide Ink // Copic Markers // Cutterbee Scissors // Tonic Stamp Platform (no longer available - Alternative Options) // Paper Flower Options // Foam Mounting Tape // Xpress it Blending Card


The second card was made for our theme at Allsorts challenge, chosen by Mervi this week it's "More Than a Single Word". I chose an old wood mounted sentiment by Penny Black for my "words". 

The pretty image is a clear stamp by Stampavie (no longer in business), this was another ebay find a couple of years ago and part of stamp lot I had found. While looking for a working link, I discovered this stamp was at some point produced by Penny Black (in a larger size), and I found it available at the Rubber Buggy. Otherwise it's probably available as a digi version from Mo's Digital Pencil

The brick wall stamp is also a stamp by Penny Black, I used Pumice Stone ink for stamping and a little bit of sponging, then added some stenciling to the bottom portion of the card. 
Image has been stamped with Memento ink on Xpress it Blending Card and colored with copic markers this time. Honestly I don't enjoy coloring with copics so much anymore, I think I forgot how to ... there is so much blending involved, it's just too complicated to have it look halfway ok! I think flowers  are much easier to color with copics than people.
Anyway, the image was fussy cut after coloring and I used Foam Mounting Tape  to adhere to the card. I embellished with a yellow  paper flower


I'm linking up with these challenges:
Card #1
Mo Manning Challenge - Something New (New to me stamp) // Colour Crazy Challenge  - Coloring // Cute Card Thursday - What's New (New to me stamp) // Sisterhood of Crafters - Thinking of You // Make My Monday - Anything But Square) 
Card#2
Path of Positivity - Character Traits (Dreamy Girl always thinking of poetry and her journal - that would have been me once upon a time :-) 
Inspire Me Monday

Thanks so much for visiting!


Jan 17, 2020

Fashion Over Forty: Staying Warm on a Winter's Day and How I Clean a Down Jacket

Happy Friday and thank you so much for visiting!

It's another winter day meaning another day to dress for the weather :-) Winter pictures are truly not easy to take. I mean I enjoy taking walks even in winter as long as it's not tooooo freezing and not windy, but then it's best to be moving to keep warm instead of trying to take pictures. But we did manage  to get a few and I'm also sharing how I clean a down jacket easily at home.

Everything but the scarf is old, I will try to link to comparable options for those of you interested.

Please note: This post includes some affiliate links, meaning I may earn a small commission if you purchase something through the links. As always, this is at no cost to you. Thank you so much for your support!


My down filled coat is new to me by Eddie Bauer but I recently found it at Goodwill. So I really didn't need another light colored coat and I really want a black coat, but couldn't pass up this "like new" premium down jacket for less than $25 dollars. 

While this specific style is no longer sold in stores, I did find a very similar style on Eddie Bauer's website in different colors .... the new style does appear a to be a little bit longer than my coat, which might be a good thing. 


Some options of the coat are on Amazon as well, with free shipping. Unfortunately Eddie Bauer doesn't offer free shipping from their website.


The lining inside this older style coat is a pretty poppy red. I love the contrasting color! Non of the newer styles have a colorful lining, but you might want to check Poshmark, maybe eBay. But keep in mind, this older style runs shorter than the newer styles. I am short and it hits me at the hip, so it will be even shorter on you if you are taller than 5'2", therefore you might prefer the newer models.


These faux fur lace up winter boots used to be my daughter's. But she outgrew them before she could really put them to use, luckily they are my size! These are by St. John's Bay. Unfortunately they are no longer available at JCPenney  and I didn't find a similar style, but several lace up boot options can be found at DSW. I did see a couple listings of these exact boots at Poshmark. They run true to size and I find them to be very comfortable!


My quarter zip plush fleece sweater is also by Eddie Bauer. This sweater is so soft and warm, I want to wear it every day! While this color is no longer available, there are a few other colors available in limited sizes and on sale. A few options are also available on Amazon - not at sales prices, but you do get free shipping through Amazon with free returns at your local Kohl's store. 


My plaid scarf is the only thing new-ish. It was purchased in November from Target, but I can no longer find it online. It's from the "A New Day" line and you may still find it at your local store.

My jeans are the AG skinny jeans I  found on eBay a couple of months ago. These premium denim jeans are so expensive when purchased new, I'd never pay full price for them, but as I type this I found them on sale at Bloomingdales. They are still expensive but  a little more acceptable.  You can also find limited sizes at Nordstrom Rack and pre-owned from eBay or Poshmark are always an option. 


How To Clean A Down Jacket:


(Be sure to read the instructions on your coat's label as well, these steps are what works for me, but I can't guarantee that they work on every down coat.)


Remove all fur/faux fur accents (if not possible remove the hood). For this reason I always make sure the fur or hood are removable before buying a coat.)

Zip up all the zippers and turn inside out. Tie the strings.

If there are any visible stains, apply a stain remover. If you think the stain is caused by oil/ grease, rub dishwashing liquid or shampoo onto the stain and you should wait approx. 10 minutes to soak the stain. (I have no patience so I rarely wait).

Place your coat inside out into a front loading washing machine. I do not add any extra laundry to this wash. I use my regular liquid detergent, currently Persil Pro Clean. I don't use any fabric softener on any of my laundry, including my down coats. Use the "Delicate Cycle" on your machine.

When washing is complete, promptly move to dryer. Add dryer balls to the machine (I add two). I've had these dryer balls for a long time but have seen this wool dryer ball set recommended by other bloggers and it's on my wish list.


I use the lowest heat setting on the dryer. Drying will take a while. You will have to repeat the drying cycle several times in order to ensure the down is completely dry and fluffy. 


What If Your Coat Comes Out Of The Dryer Looking Like It Has Some Weird Stains And Streaks?

This did happen to me with both of my lighter colored down coats the first time they were put into the washing machine. I read somewhere online that there could be some factory reside on the down, this will cause your lighter colored coat to look like it's dirty all over. The first time I thought I had ruined my coat, but I simply threw it back into the washing machine and the dryer, and the second time all the weird looking streaks and stains had disappeared.


Shop today's look:

Remember, some of the links in this post are affiliate links, meaning I may earn a small commission if you purchase something through the links, at no cost to you. 


Thanks so much for taking the time out of your day to visit my blog. I hope you found this post of interest!


I'm linking up with these wonderful blogs.


Btw, you can also find me here:

Pinterest // Instagram // Facebook

You can also use the "follow by email" function on the blog's sidebar to receive a notification when a new post goes live.

Jan 11, 2020

Allsorts Challenge 554 and How To Easily Mask Mistakes While Adding Interest to Your Card

Today is the start of a new theme at Allsorts challenge with this week's topic of "Say it with Flowers" hosted by Brenda. We have a great prize to give away by Bee Crafty - a pretty floral stamp and sentiment -  so hopefully you'll join us for your chance to win!


Disclosure: This post includes some affiliate links, meaning I may earn a small commission if you purchase something through the links. As always, this is at no cost to you. Thank you so much for your support!


I stamped and heat embossed the image from the set Blooming Garden using Versafine Clair Nocturne ink and Clear Embossing Powder. With a circle mask in place I inked the paper using Blueprint Sketch ink, starting at the bottom and using a lighter touch towards the top. Next I used Seedless Preserves ink on the bottom 1/3 of the card blending with the blueprint sketch ink.

Thought it would be a good idea to wash my hands (as you can imagine I had pretty inky fingers at this point and usually transfer some ink to the white part of the card.) Well, even though I dried my hands there must have still been some moisture on my fingers as it took away some of the ink, the way how distress inks react to water.

Related Products:


How I Easily Saved My Card:

This is not a new idea, I'm sure many of you do similar things, but since there are always newbie card makers out there, I thought it's worth a mention.

A piece of bubble wrap was laying around on my desk and I thought it would be the perfect item to use to fix the card. I lightly spritzed it with water then pressed down onto the inked paper, just like a stamp. And since distress ink reacts this way to water, I was left with a pretty background. As a matter of fact several supplies and random things found in the kitchen or the office could be used in place of stamps or stencils to add interest to a card, which will help mask mistakes. This card was meant to be Clean and Simple.

The butterflies were also added because of a mistake. When I removed the circle mask, I noticed the circle must have shifted at some point because the bottom edge of the circle was smudged. This is when I decided to add the butterflies, I only needed one but it made more sense to add 3. I used an old Martha Stewart punch to make the butterflies out of distressed inked paper and added an sticky rhinestone to their body centers.


The blossoms and pods were stamped again on xpress it blending card then colored with copic markers. The sentiment from the Penny Black set Friendship was stamped and heat embossed directly onto the inked background. I rub an embossing buddy over the card before stamping, this will prevent the embossing powder from sticking to other parts of the card and it will only stick to the stamped impression.


Thanks so much for visiting!!


Btw, you can also find me here:

Pinterest // Instagram // Facebook

You can also use the "follow by email" function on the blog's sidebar to receive a notification when a new post goes live. 


Sharing with these blogs:
Alphabet Challenge - T for Try Something Different (Bubble Wrap Stamping) // Cute Card Thursday - Embellish // Double D Challenges - Punches (butterfly punch) // Fab n Funky - No Design Papers // Simon Says Stamp - Fun with Florals // We Love 2 Create - Something Creative/Mixed Media // Penny Black Saturday Challenge  - PB Stamps
Daring Card Makers (my chosen 3 elements are: Flowers, Dots, the color Blue) // Inspire Me Mondays
  Inspire Me Monday

I've linked to some of the products on Amazon for those of you interested. As a reminder, these are affiliate links meaning I may earn a small commission if you purchase something through the links, as always at no cost to you.